


The Reports section describes different reports available in the pSuite. This also explains how to use view these reports.
|
|
How many types of reports are available in the pSuite? |

There are two types of reports available in pSuite:
-
Weekly Reports - These are the reports which display the project/ task status and other information on the basis of a customized criterion. Such reports provide information on the basis of data available for weekly basis. Reports that are categorized into this category are:
-
Plans v/s Achievements
-
Project Requests
-
Defect Analysis
-
Project Deliveries
-
-
General Reports – These are the most commonly used reports of the system. Reports included in this category are:
This section describes how to manage different weekly reports in pSuite.
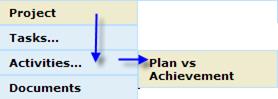
Figure 51: Activities menu
|
|
How many types of Activities are available in the pSuite? |
There are seven different kinds of weekly reports available in pSuite:
-
Plans v/s Achievements
This section describes how to manage the Plans v/s Achievements report.
|
|
How to view Plans v/s Achievements report? |
-
Click on the Weekly Reporting menu on the Top menu bar to view the menu items available in the Weekly Reporting menu. Now click on the Plans v/s Achievements menu item. A Plans v/s Achievements page opens in the User’s dashboard area.
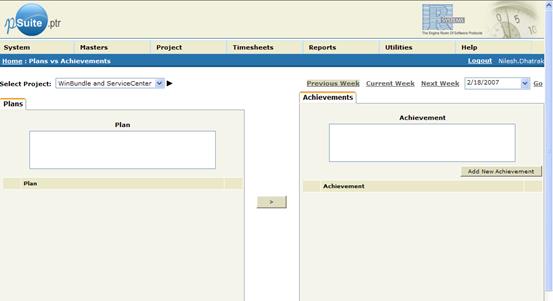
Figure 52: Plans v/s Achievements page
-
Select a project from the Select Project dropdown list box (available at the upper-left corner of the page). Initially, the project which has been set as the “default project” in the dashboard is selected. Initially the plans and achievements for the current week are displayed in the page.
-
All plans that are pending or in-progress are displayed in the Plans panel. Also, all achieved plans are available in the Achievements panel.
|
|
How to view Plans v/s Achievements report for a particular week? |
-
Click on the Previous Week / Next Week button to view the Plans v/s Achievements report for previous or next week from the selected week.
-
The report for a specific week can also be viewed. Select the day of the week from the Date field (available at the upper-right corner of the page) and click on the Go button to view the report for the selected week.
|
|
How to add a new plan / achievement? |
-
From the Plans v/s Achievements page Specify a plan in the Plan For Next Week text field of the Plans panel and click on the Add New Plan button.
-
Similarly, a new achievement can also be specified in the This Week’s Achievement text field of the Achievements panel by clicking on the Add New Achievement button.
|
|
How to change a completed plan into Achievement? |
-
Select a plan from the Plans panel and click on the
 button to convert the specified plan into achievement. The pSuite automatically assigns the current date as the end date of the achievement.
|
|
How to change an achievement into a plan for the next week? |
-
Select an achievement from the Achievements panel and click on the
 button to convert the specified achievement into a plan for the next week.
This section describes how to view the common reports available in the pSuite.
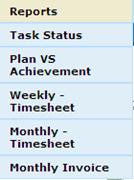
Figure 53: Reports menu
|
|
What are the different types of general reports in the pSuite? |
There are four kinds of general reports available in pSuite:
-
-
Weekly
-
Monthly
-
-
-
Monthly
-
This section describes the different types of timesheet reports available for the pSuite users.
|
|
What are the different types of timesheet reports in the pSuite? |
There are two kinds of timesheet reports:
-
Weekly Timesheet Report – The weekly timesheet report, display the week-wise summary report of the timesheets filled by each resource of the project.
-
Monthly Timesheet Report - The monthly timesheet report, display the month-wise summary report of the timesheets filled by each resource of the project.
|
|
How to access the weekly timesheet report? |
-
Click on the Reports menu on the Top menu bar to view the menu items availableNow click on the Weekly-Timesheet menu item. A Timesheet Report page opens in the User’s dashboard area.
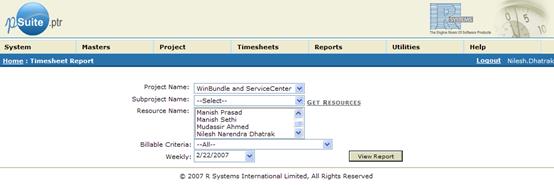
Figure 54: Timesheet Report (Weekly) page
-
Select the project name from the Project dropdown list box. Initially, the project which has been set as the “default project” in the dashboard is selected. Select the project resources from the Resources list box.
-
Specify a billing criteria and a day of the week for which the report has to be generated, in the Billing Criteria and the Weekly fields.
-
Click on the View Report button to view the report. A Timesheet Report page opens in a popup window. The resource-wise weekly summary report of the specified week is displayed.
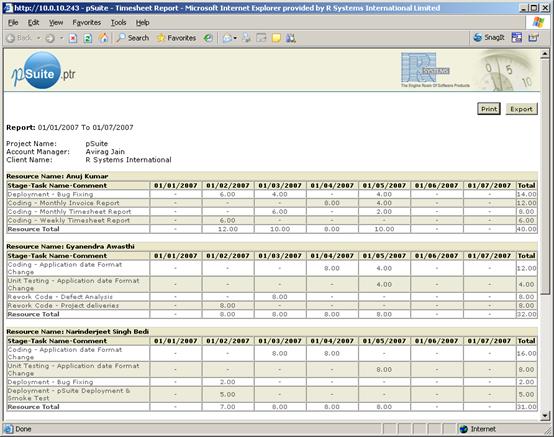
Figure 55: Timesheet (Weekly) Report
|
|
How to view the monthly timesheet report? |
-
Click on the Reports menu on the Top menu bar to view the menu items available in the Reports menu. Now click on the Monthly-Timesheet menu item. A Timesheet Report page opens in the User’s dashboard area.
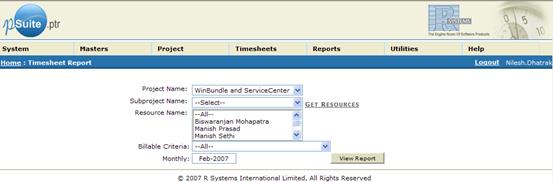
Figure 56: Timesheet (Monthly) Report page
-
Select the project name from the Project dropdown list box. Initially, the project which has been set as the “default project” in the dashboard is selected. Select the project resources from the Resources list box.
-
Specify a billing criteria and the month for which the report has to be generated, in the Billing Criteria and Monthly fields.
-
Click on the View Report button to view the report. A Timesheet Report page opens in a popup window. The resource-wise weekly summary report of the specified month is displayed.
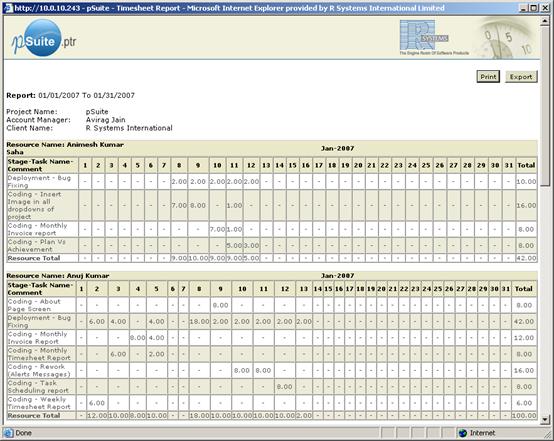
Figure 57: Timesheet (Monthly) Report
|
|
How to print the timesheet report? |
-
From the Timesheet Report page, click on the Print button (available at the upper-right corner of the page) to print the generated report.
|
|
How to export the timesheet report into Microsoft Excel worksheet? |
-
From the Timesheet Report page, click on the Print button (available at the upper-right corner of the page) to export the generated report into Microsoft Excel worksheet.
This section describes the details of the monthly invoice reports.
|
|
How to access the invoice report? |
-
Click on the Reports menu on the Top menu bar to view the menu items available in the Reports menu. Now click on the Monthly Invoice menu item. A Project Monthly Invoice page opens in the User’s dashboard area.
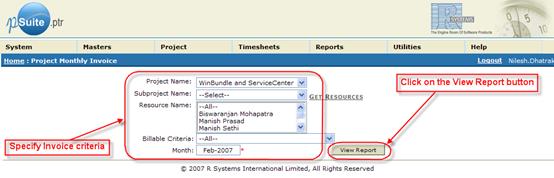
Figure 58: Project Monthly Invoice page
-
Select the project name from the Project dropdown list box. Initially, the project which has been set as the “default project” in the dashboard is selected. Select the project resources from the Resources dropdown list box.
-
Specify a billing criteria and the month for which the report has to be generated, in the Billing Criteria and Month fields.
-
Click on the View Report button to view the report. The report is displayed in a popup window.
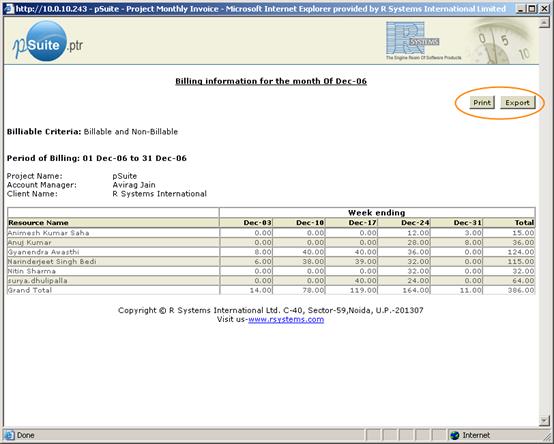
Figure 59: Popup window with options to print or export the invoice
|
|
How to print the report? |
-
From the Project Monthly Invoice popup window, click on the Print button to print the generated report.
|
|
How to export and save the report in MS Excel format? |
-
From the Project Monthly Invoice popup window, click on the Export button to export and save the generated report as Microsoft Excel worksheet. A File Download page opens. Click on the Open button to open or Save button to save the worksheet.
This section describes different reports related to plans and achievements for a project.
|
|
How to access the plans v/s achievements report? |
-
Click on the Reports menu on the Top menu bar to view the menu items available. Now click on the Plan v/s Achievement menu item. A Plan v/s Achievement page opens in the User’s dashboard area.
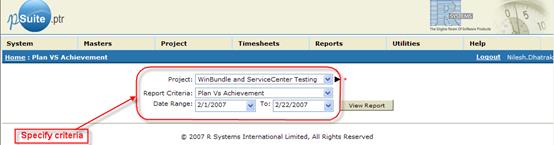
Figure 60: Plan v/s Achievement page
-
Select the project name from the Project dropdown list box. Initially, the project which has been set as the “default project” in the dashboard is selected.
-
Specify a report criteria and the date range for which the report has to be generated, in the Report Criteria and Date Range fields.
-
Click on the View Report button to view the report. The report is displayed in a popup window.
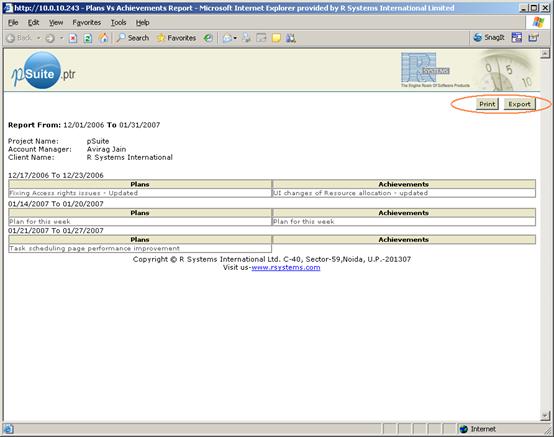
Figure 61: Plan v/s Achievement report
|
|
How to print the report? |
-
From the Plan v/s Achievement popup window, click on the Print button to print the generated report.
|
|
How to export and save the report in MS Excel format? |
-
From the Plan v/s Achievement popup window, click on the Export button to export and save the generated report as Microsoft Excel worksheet. A File Download page opens. Click on the Open button to open or Save button to save the worksheet.