


After a project has been initiated the next step is to schedule tasks for the project. This section describes how to define, assign and schedule task templates for the project and its associated resources.
This section covers following details:
-
Define Project Tasks
-
Add, modify and delete tasks.
-
Import/ export task templates.
-
Allocate resources to the tasks.
-
Attach attachments and track task status
-
-
Assign Tasks
-
Allocate tasks to the resources.
-
-
Task Scheduling Reports
The above mentioned functions are available in the Task Templates menu of the pSuite software. The graphic below, display the options available in the Task Scheduling menu:
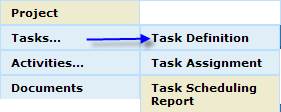
Figure 28: Task Scheduling page
This section describes how to define tasks for a specific project.
|
|
How to choose a project for task and resource allocation? |

-
Click on the Task Scheduling under Project menu in Tasks on the Top menu bar to view the menu items available in the Task Scheduling menu. Now click on the Task Assignment menu item. A Task Definition page opens in the User’s dashboard area.
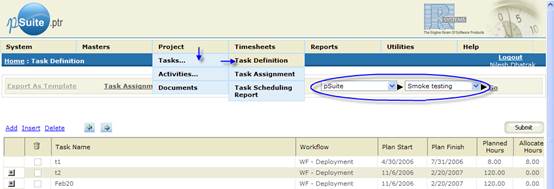
Figure 29: Task Definition page with project selection option
-
Select a project from the Select Project dropdown list box (available at the upper-right corner of the page). Initially, the project which has been set as the “default project” in the dashboard is selected.
|
|
How to add a new project task? |
-
From the Task Definition page click on the Add button to add a new task. A new row is added in the data grid. Click upon the Workflow column and select a project workflow for the specified task. Similarly provide other details for the task.
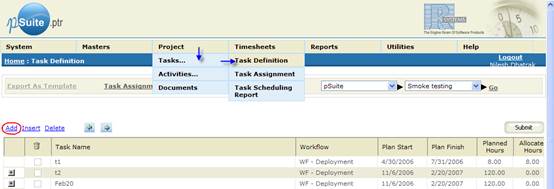
Figure 30: Task Definition page with Add button
-
Click on the Submit button to save changes in the database.
|
|
Things to remember |

Click on the Insert button to insert a new task before the selected task.
|
|
How to create a project sub-task? |
-
Select a task from the data grid of the Task Definition page and click on the
 button to convert the selected task into a sub-task.
 -
Clicking the
 button resets the sub-task into a parent task.
 -
Click on the Submit button to save changes in the database.
|
|
How to modify the custom fields? |
-
Click on the Show/ Hide Columns button and select the custom fields from the popup. Clicking upon the Submit button of the popup display the new columns in the data grid.
-
Specify values in the fields and click on the Submit button to save changes in the database.
|
|
How to remove a project task? |
-
From the Task Definition page select a task from the data grid and click on the Delete button to remove the selected record.
|
|
How to allocate the resources to the project task? |
-
From the Task Definition page, click on the # of Res. Column that appear at the end of each record in the data grid. The Assign Tasks page opens in the popup window. Select the resources and assign workflow stages to them. Click on the
 button to add more resources.
 -
Click upon the Submit button to save changes and close the window. See Assign Tasks to know more about assigning project tasks to the resources
|
|
How to set the priority of the project tasks? |
-
Click on the
 column of the specified record and choose the task priority from the popup. An image appears in the column according to the priority opted.
 -
Click on the Submit button to save changes.
|
|
How to change the status of a task? |

-
Click on the
 column of the specified record and choose the task status from the popup. An image appears in the column according to the specified task status.
 -
Click on the Submit button to save changes.
|
|
How to view closed/ open and on-hold tasks? |
-
Select the type of tasks from the Show Tasks checkbox group and click on the Go button to view relevant tasks.
|
|
How to attach a file attachment? |
-
Click on the
 column of the specified record and click on the Add Attachment button from the popup. A Task Attachment page opens as a popup window.
Figure 31: Task Attachment page
-
Specify the document title and browse for the file attachment(s). Click on the Upload button to upload the selected file(s).
-
Close the popup window. A
 appears in the column.
|
|
How to inform resources about the tasks allocated to them? |
-
Click on the Inform Resources button to send an email to the resources who have been assigned one or more tasks. An Inform Resources page opens as a popup window. The list of resource who will receive the message is displayed in the Resource data grid.

Figure 32: Inform Resources page
-
Specify the message to be sent to the resources, in the Message text field. Click on the Send button to inform the resources about the new tasks assigned.
Assign Tasks
This section describes how to assign tasks to the project resources.
|
|
What are the different methods of allocation of tasks to the project resources? |
There are two ways to assign tasks for the project resources. First is task-wise allocation where the resources are assigned a specific task from the available list of resources and the other is resource-wise allocation where the tasks are allocated on the basis of available list of tasks.
|
|
How to choose a project for task and resource allocation? |
-
Click on the Task Assignment menu under Project Menu in Tasks on the Top menu bar to view the menu items available in the Task Assignment menu. Now click on the Task Assignment menu item. An Assign Resources page opens in the User’s dashboard area.
-
Select a project from the Select Project dropdown list box (available at the upper-right corner of the page). Initially, the project which has been set as the “default project” in the dashboard is selected.
|
|
How to allocate task using the task-wise resource allocation? |
-
From the Assign Resources page, click on the Task wise tab of the panel that appears at the left side of the user’s dashboard. The list of tasks available in the project is displayed in the panel.
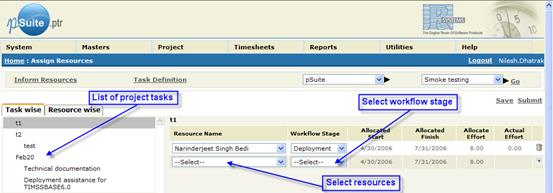
Figure 33: Assign Resources page (Task Wise panel)
-
Select a task from the panel. The project resources that have already been allocated the selected project tasks are listed in the panel available at the right side of the user’s dashboard.
-
Select a resource from the Resource Name drop down list box and specify other details. Click on the
button or the Save button to add a new record. -
Similarly select other resources for the same task or different tasks and click on the Submit button to save changes.
|
|
What is Rule Based Allocation and how to allocate tasks using the Rule Based Allocation method? |
The “Rule Based Allocation” is a method of assigning the unassigned tasks (tasks that are not assigned to any resources yet) to the available resources, on the basis of rules mentioned during the creation of workflow stages.
-
From the Assign Resources page, click on the Task wise tab of the panel that appears at the left side of the user’s dashboard. The list of tasks available in the project is displayed in the panel.
Figure 34: Assign Resources page (Task Wise panel)
-
Select an unassigned task from the panel. A Rule based Allocation button appears at the upper right corner of the page. Click on the Rule based Allocation button to allocate tasks according to the rules of resource allocation.
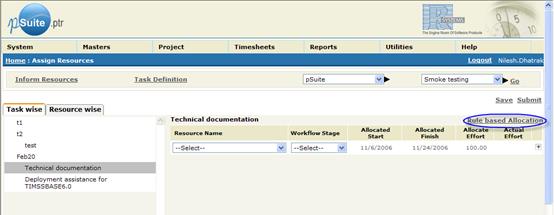
Figure 35: Assign Resources page with “Rule based Allocation” option
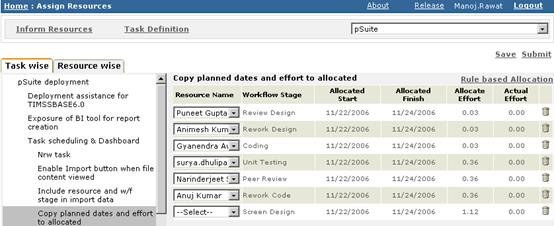
Figure 36: Rule based allocation of tasks
-
The resources will be allocated according to the percentage of efforts allocated to individual resource during workflow creation. Also, Allocated Start and Allocated Finish dates are copied from the allocated start and end dates for the specified task.
-
If a default resource has already been opted during the workflow creation, then the same resource name is displayed in the Resource Name drop down list box. Otherwise, select a resource from the Resource Name drop down list box.
-
Click on the Submit button to save changes.
|
|
How to allocate task using the resource-wise task allocation? |
-
From the Assign Resources page, click on the Resource wise tab of the panel that appears at the left side of the user’s dashboard. The list of resources available in the project is displayed in the panel.
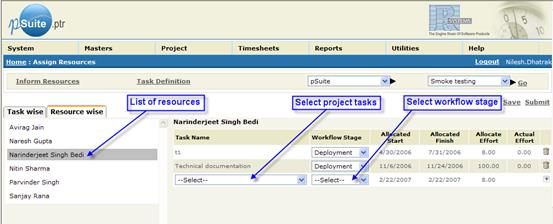
Figure 37: Assign Resource page (Resource Wise panel)
-
Select a resource from the panel. The project tasks that have already been allocated the selected resource are listed in the panel available at the right side of the user’s dashboard.
-
Select a task from the Task Name drop down list box and specify other details. Click on the
button or the Save button to add a new record. -
Similarly select other tasks for the same resource or different resources and click on the Submit button to save changes.
|
|
How to remove a task/ resource allocation? |
-
Click on the
 button of the row containing the resource/ project task to delete the selected record.
|
|
How to add, modify or delete project tasks? |
-
Click on the Task Definition button to add, modify or delete the project tasks. See Define Project Tasks for more information
|
|
How to inform resources about the tasks allocated to them? |
-
Click on the Inform Resources button to send an email to the resources who have been assigned one or more tasks. An Inform Resources page opens as a popup window. The list of resource who will receive the message is displayed in the Resource data grid.
-
Specify the message to be sent to the resources, in the Message text field. Click on the Send button to inform the resources about the new tasks assigned.
This section display a task-wise report of the resources allocated to the project tasks.
|
|
How to choose a project for task and resource allocation? |
-
Click on the Task Scheduling in Tasks under Projects menu on the Top menu bar to view the menu items available in the Task Scheduling menu. Now click on the Task Scheduling Report menu item. A Task Scheduling Report page opens in the User’s dashboard area.
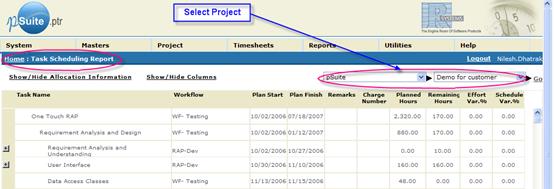
Figure 38: Task Scheduling Report page
-
Select a project from the Select Project dropdown list box (available at the upper-right corner of the page). Initially, the project which has been set as the “default project” in the dashboard is selected.
|
|
How to view the task scheduling report? |
-
The Task Scheduling Report page display list of project tasks available in the project. Click on the
button that appears before those project tasks which have one or more resources allocated. -
A mini data grid is displayed showing the resources allocated to the specified project task.
|
|
How to show/ hide all resources in the task scheduling report? |
-
Click on the Show/ Hide Allocation Information button (that appear at the upper-left corner of the Task Scheduling Report page) to show or hide the resources of all project tasks.
|
|
How to show/ hide the custom fields in the task scheduling report? |
-
Click on the Show/ Hide Columns button and select the custom fields from the popup. Clicking upon the Submit button of the popup display the new columns in the data grid.