


This section explains the processes involved in the maintaining the master elements of pSuite.
|
|
What are the master elements in pSuite? |

The master elements include:

Figure 9: Masters Menu
This section describes how to manage clients and other details related to them.
|
|
How to create a new client in pSuite? |
-
Click on the Masters menu on the Top menu bar to view the menu items available. Now click on the Clients menu item. A Clients page opens in the User’s dashboard area. The client list available in the database is displayed in the grid.
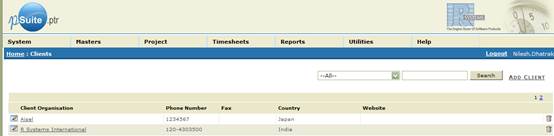
Figure 10: Clients page
-
Click on the Add Client button (available at the upper-right corner of the grid). An Add Client page opens in the User’s dashboard area.
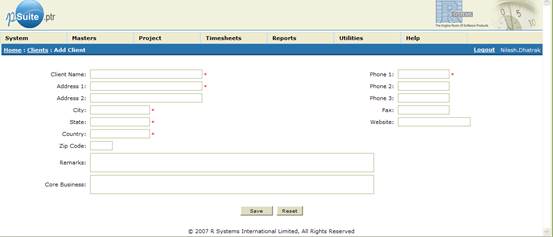
Figure 11: Add client page
-
Specify the client details in relevant fields and click on the Save button to save changes in the database. Once the client information is saved in the database, Client Contacts, Client Projects and Client Documents grids with labeled headers are displayed.
-
Now the client contacts and client projects can be added. See Manage Client Contact Details and Manage Projects for details.
|
|
Things to remember |

Fields marked with a “*” in the Add/ Edit Client page are mandatory.
|
|
How to view the list of clients and their details in pSuite? |
-
Click on the Masters menu on the Top menu bar to view the menu items available in the Masters menu. Now click on the Clients menu item. A Clients page opens in the User’s dashboard area. The client list available in the database is displayed in the grid.
-
There is a limit for displaying the number of records in one page. If the record count reaches the maximum count set per page, a pagination bar appears at the upper-right corner of the grid. Click on the page numbers to view the records from relevant page.
-
Clicking upon the cell of Client Organization column display the client details for the specified client. A Client Information page opens in the user’s dashboard displaying the client details.
|
|
How to find a client in pSuite? |
-
A search box is available at the upper-right corner of the Clients page. Select a search criterion from the first text field and specify relevant information in the other. Now click on the Search button to find the specified record.
|
|
How to modify the client details? |
-
From the Clients page, click on the
 button of the row containing the specified client details. An Edit Client page opens.
 -
Now the client details can be modified. Click on the Save button to save changes in the database.
|
|
How to reset the page contents during the creation of new record or modifying the client details? |
-
If you have wrongly entered the data or you do not want to change the client details then click on the Reset button to reset the page to its last saved state.
|
|
How to remove a client record from the pSuite? |
-
From the Clients page click on the
 button of the row containing the client details to remove the selected record from the pSuite database.
|
|
Things to remember |
A client detail cannot be removed if it is associated with a project.
Once a client is added, it is required to provide the client contact details for communicating with the client during the project development. This section explains how to manage the client contact details.
|
|
How to add a new client contact in pSuite? |
-
From the Edit Client page click on the Add Contact button available at the upper-right corner of the Client Contact labeled grid. An Add Client Contact page opens.
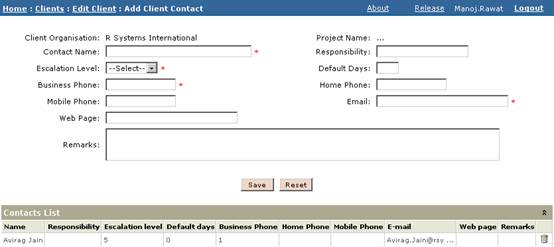
Figure 12: Add Client Contact page
-
Provide the client contact details in relevant fields. Click on the Save button to save changes in the database. The added client contact is added into the Contacts List labeled grid.
|
|
Things to remember |
Fields marked with a “*” in the Add/ Edit Client page are mandatory.
|
|
How to view the list of client contacts for the selected client? |
-
The list of client contacts associated with a specified client is listed in the Client Contact labeled grid of Edit Client page. The complete client contact list is also displayed while modifying the client contact details.
|
|
How to modify the client contact details? |
-
The list of client contacts associated with specified client is listed in the Client Contact labeled grid of Edit Client page. The complete client contact list is also displayed while modifying the client contact details.
-
Click on the
button of the row containing the specified client contact. An Edit Client Contact page opens. -
Now the contact details can be modified. Click on the Save button to save changes in the database.
|
|
How to reset the page contents during the creation of new record or modifying the client contact details? |
-
If you have wrongly entered the data or you do not want to change the client contact details then click on the Reset button to reset the page to its last saved state.
|
|
How to remove a client contact record from the pSuite? |
-
A client contact can be removed either from the Edit Client page or the Edit Client Contact page. Click on the
button of the row containing the contact details to remove the selected record from the pSuite database.
|
|
Things to remember |
A client detail cannot be removed if it is associated with a project.
This section describes the processes involved in the development and maintenance of projects currently under development at RSI.
|
|
How to create a new project in pSuite? |
-
Click on the Masters menu on the Top menu bar to view the menu items available in the Masters menu. Now click on the Project Definition menu item. A Project Definition page opens in the User’s dashboard area. The list of currently running/ completed projects is displayed in the grid.
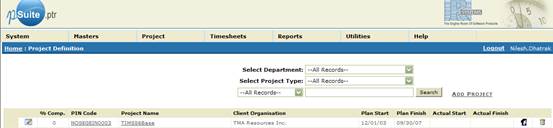
Figure 13: Project Definition page
-
Click on the Add Project button (available at the upper-right corner of the grid). An Add Project page opens in the User’s dashboard area.
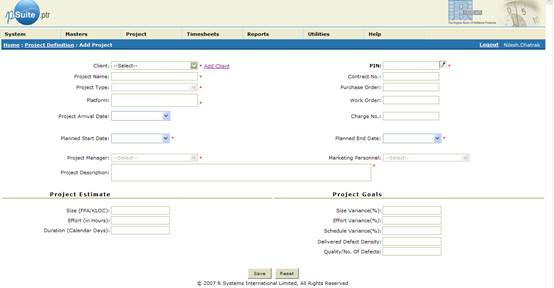
Figure 14: Add Project page
-
Select the name of the client from the Client dropdown list box or click on the Add Client button to add a new client. The Add Client page opens. See Manage Client Details for further details
-
Click on the
 button to generate a pin number for the project. A Project Pin Add popup window opens. Provide the project details and click on the Generate Pin button to generate a new pin.
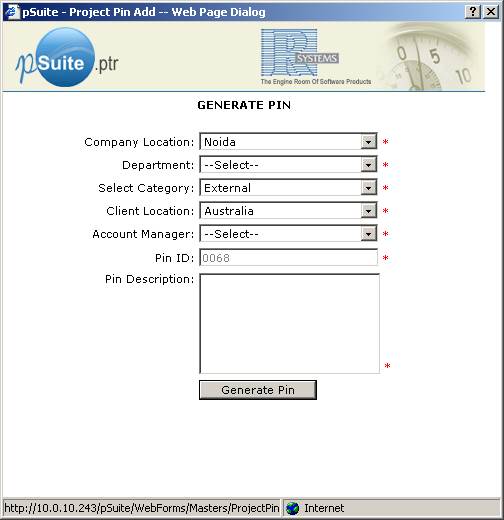
Figure 15: Project Pin Add page
-
Provide other required information including the project estimate and goals in the Project Estimate and Project Goals section. Click on the Save button to save changes in the database.
-
Once the project details are saved in the database, the Team Members, Project Contacts, Sub Projects, Project Documents and Project Workflow grids with labeled headers are displayed.
|
|
Things to remember |
Fields marked with a “*” in the Add/ Edit Project page are mandatory. Once generated a new pin cannot be generated again for the same project.
|
|
How to view the project list available in pSuite? |
-
Click on the Masters menu on the Top menu bar to view the menu items available in the Masters menu. Now click on the Project Definition menu item. A Project Definition page opens in the User’s dashboard area. The list of currently running/ completed projects is displayed in the grid.
-
There is a limit for displaying the number of records in one page. If the record count reaches the maximum count set per page, a pagination bar appears at the upper-right corner of the grid. Click on the page numbers to view the records from relevant page.
-
Clicking upon the cell of Project Name column display the project details for the specified project. A Project Information page opens in the user’s dashboard.
|
|
How to find a project? |
-
A search box is available at the upper-right corner of the Project Definition page. Select a department from the Select Department dropdown list box. The list of all project types is displayed in the Select Project Type dropdown list box.
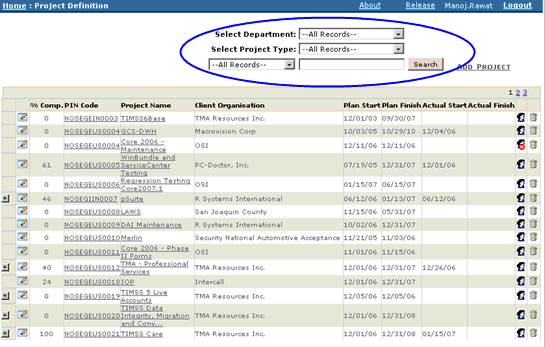
Figure 16: Project Definition Page with Search Box (highlighted)
-
Select the project type from the Select Project Type dropdown list box. Clicking upon the Search button display relevant records in the grid.
-
Searching for the projects can be refined more by choosing a criterion from the “--All Records--” dropdown list box and specifying a value in the text field available.
|
|
How to modify the client details? |
-
From the Project Definition page, click on the
button of the row containing the specified project details. An Edit Project page opens. -
Modify the project details and click on the Save button to save changes in the database.
|
|
How to reset the page contents during the creation of new record or modifying the project details? |
-
If you have wrongly entered the data or you do not want to change the project details then click on the Reset button to reset the page to its last saved state.
|
|
What is a custom field and why is it required? |
A custom field is a customized text field used to store project related additional information during the creation of project tasks See Scheduling Project Tasks for details for managing project tasks. There are ten custom text fields, three numeric fields and three date fields to store relevant information.
-
From the Edit Project page, click on the Rename button (appear below the Project Description text field) to provide a label to the custom field. A Task Custom Fields dialog box opens as a popup window.
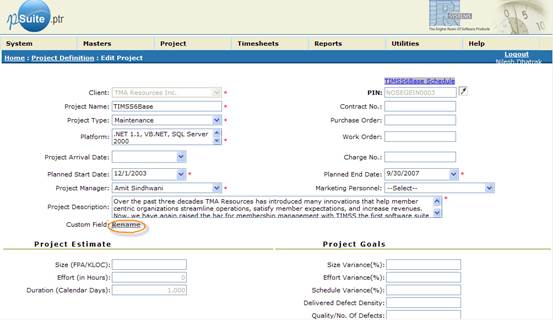
Figure 17: Edit Project page with “Rename” button
Figure 18: Task Custom Fields page
-
Provide the label text for the custom field and click on the Save button to save changes in the database. The specified label will be used to identify the specified custom field while creating the tasks.
|
|
How to remove a project record from the pSuite? |
-
From the Project Definition page click on the
button of the row containing the client details to remove the selected record from the pSuite database.
|
|
Things to remember |
A project cannot be removed if the timesheet for the selected project has been filled by the resources.
|
|
How to choose the team members from the available resources? |
-
From the Edit Project page click on the Add Team Member button available in the Team Members labeled data grid. The Resource Pool page opens. Now the project resources can be added. See for selecting and managing project resources.
|
|
How to assign access rights of for the individual project resource? |
-
From the list of available resources available in the Team Members data grid click on Edit Project Rights button. An Access Rights page opens. The access rights for the selected resource can be assigned or changed. See Assign Rights to Departments and Roles for more details on the access rights
|
|
Things to remember |
The access rights assigned to an individual project resource have specified access in the pSuite for the specified project only.
|
|
How to specify the allocation percentage(%) of for the project resource? |
-
From the list of available resources available in the Team Members data grid click on Change Allocation button. A Resource Sheet page opens.
-
Specify resource information in relevant fields and click on the Update button to save changes.
|
|
How to enable/ disable a project resource? |
-
Click on the
 toggle button of the row containing the specified resource information and disable the selected resource in the pSuite. Once the resource account is disabled, the toggle button icon changes to
  . Clicking again the same button enables the selected resource in the pSuite.
|
|
How to remove a project resource? |
-
Click on the
button of the row containing the specified record to delete the specified resource.
|
|
How to setup project contacts? |
-
From the Edit Project page click on the Add Project Contact button available in the Project Contacts labeled data grid. The Add Project Contact page opens.
-
Specify the contact details and click on the Save button to save changes to the pSuite database.
-
The list of already available client contacts is also listed in the Contact Lists labeled data grid of the Add Project Contact page. Selecting the checkboxes in the grid and clicking upon the Associate With Project button adds up the selected client contact with specified project.
|
|
Things to remember |
The client contacts that have already been added to the specified project are marked as “checked” in the Contact List labeled data grid.
|
|
How to modify the project contacts? |
-
From the Edit Project page click on the
button available with each record of the Project Contacts labeled data grid. The Edit Project Contact page opens. -
Modify the contact details and click on the Save button to save changes to the pSuite database.
|
|
Things to remember |
More project contacts can be modified from the Edit Project Contact page by clicking upon the button available with each record of the Contact List labeled data grid.
|
|
How to remove a project contact? |
-
The project contacts can be removed from either the Project Contacts data grid of Edit Project page or the Contacts List data grid of the Add/ Edit Project Contact page. Click on the
button of the row containing the specified record to delete the specified project contact.
|
|
How to create a sub-project in pSuite? |
-
From the Edit Project page click on the Add Sub Project button available in the Sub Projects labeled data grid. A Sub Project page opens.
-
While creating a sub-project the client’s name, development platform and project description are automatically inherited from the parent project.
-
Like the client’s name, the pin number details are also inherited from the parent project. Click on the
button to generate a pin number for the project. A Project Pin Add popup window opens. Provide the pin description in the Pin Description text field and click on the Generate Pin button to generate a new pin. -
Provide other required information and click on the Save button to create a new sub-project.
-
Once the project details are saved in the database, the Team Members, Project Contacts, Project Documents and Project Workflow labeled data grids are displayed.
|
|
Things to remember |
Fields marked with a “*” in the Add/ Edit Project page are mandatory. Once a sub-project is created in the system, the team details and the project workflow are also inherited from the parent project. Adding information to the sub-project is same as that of a project.
|
|
How to add the project workflow? |
-
Once a new project is created, the default RSI workflow is attached to it. This workflow can be modified or even a new workflow can be created for the project. From the Edit Project page click on the Add/ edit Workflow button available in the Project Workflow labeled data grid. The Project Workflow page opens.
-
Clicking upon the Add Project Workflow button available in the Project Workflow page adds a new row in the data grid. Specify the workflow name and description in relevant columns and click on the Save button to create a new workflow.
|
|
How to modify the project workflow? |
-
From the Edit Project page click on the Add/ edit Workflow button available in the Project Workflow labeled data grid. The Project Workflow page opens.
-
Double click upon the grid columns to modify the contents and click on the Save button to save changes in the database.
|
|
How to remove a project workflow? |
-
The project contacts can be removed from either the Project Workflow data grid of Edit Project page or the Project Workflow page. Click on the
button of the row containing the specified record to delete the specified project workflow.
|
|
How to Import a project workflow? |
-
From the Project Workflow page select a workflow from the Available Workflow data grid and click upon the Import Workflow button. The available workflow is added to the project workflow list.
|
|
How to manage the project workflow stages? |
-
From the Project Workflow page click on the Project Workflow Stages button available with each record. The Project Workflow Stages page opens. Now the workflow stages can be managed for the selected project workflow. See Manage Workflow Stages for further information on managing the workflow stages
The resource pool the pSuite allows accounts managers to choose the resources required for a particular project. This section describes how to manage resources for a project.
|
|
How to select the project resources? |
-
Click on the Masters menu on the Top menu bar to view the menu items available in the Masters menu. Now click on the Resource Pool menu item. A Resource Pool page opens in the User’s dashboard area. The list of all resources available at RSI is displayed in the Resource Pool data grid.

Figure 19: Resource Pool page with “Select Resource” button
-
Select the resource from the Resource Pool data grid and click on the Select Resource button (available at the upper left corner of the grid) to shortlist the selected resource. The selected resources are listed in the Short Listed Resources data grid.
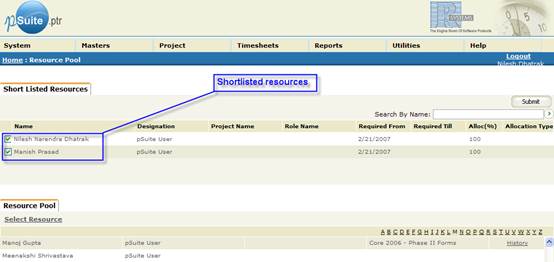
Figure 20: Resource Pool page (Short listed resources)
-
Click upon the Project Name column for each record to select the project name for the resource from the popup list of projects.
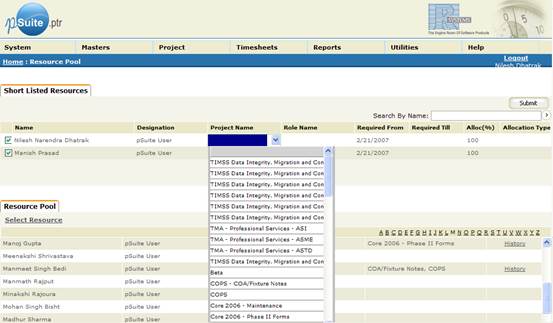
Figure 21: Click on the “Project Name” column to associate a project
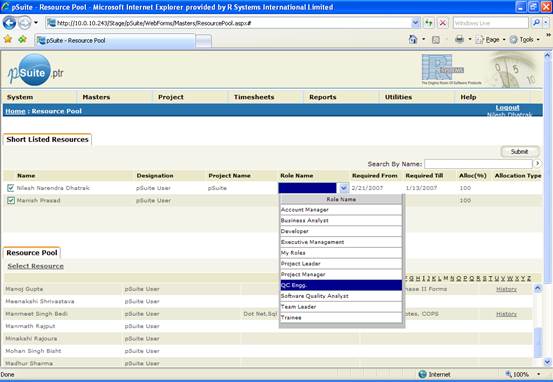
Figure 22: Click on the “Role Name” column to associate a role
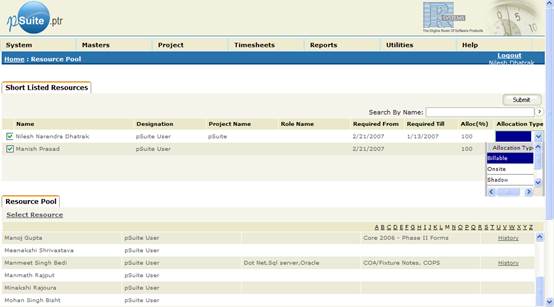
Figure 23: Click on the “Allocation Type” column to associate a role
-
Similarly specify the resource role, allocation type and other details for the specified project. Click on the Submit button to assign the selected resources to the specified project.
|
|
Things to remember |
Multiple resources can be selected by selecting the resources using CTRL key. Also, multiple resources for multiple projects can also be selected from the Resource Pool page.
|
|
How to view the resource list for a particular project? |
-
The resources can be viewed while viewing the project details. See Manage Projects for details
|
|
How to find and shortlist the search results? |
-
Type the resource name in the Search By Name text field. All resources matching the specified name are displayed with their designations in a popup. Select the resource from the popup and click on the
 button. The selected resource is added into the Short Listed Resources data grid.
 -
Provide project name, role name resource type and other details. Click on the Submit button to add the short-listed resource.
This section describes how to manage project and client documents for a specific client or project.
|
|
How to add a new client/ project document? |
-
Click on the Project menu on the Top menu bar to view the menu items available in the Project menu. Now click on the Documents menu item. A Documents page opens in the User’s dashboard area.
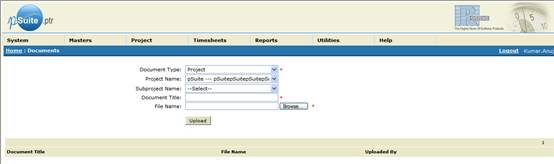
Figure 24: Documents page
-
Select a document type from the Document Type dropdown list box.
-
If the document is a client document then select the client from the Client dropdown list box.
-
Otherwise, select the project name from the Project dropdown list box. The list of already available documents is displayed in the data grid available below the Upload button.
-
Specify document title in the Document Title text field and browse for the file using the Browse button.
-
Click upon the Upload button to upload the selected document.
|
|
Things to remember |
Fields marked with a “*”are mandatory.
|
|
How to view the documents uploaded for a particular client/ project? |
-
Click on the Project menu on the Top menu bar to view the menu items available in the Project menu. Now click on the Documents menu item. A Documents page opens in the User’s dashboard area.
-
Select a document type from the Document Type dropdown list box.
-
If the document is a client document then select the client from the Client dropdown list box.
-
Clicking upon the document title opens the selected document in the web browser.
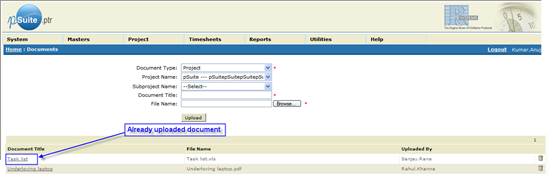
Figure 25: List of already uploaded documents
|
|
How to remove a project record from the pSuite? |
-
From the Documents page click on the
button of the row containing the document details to remove the selected record.
This section describes how to manage department specific task templates that are used for task scheduling of the projects.
|
|
How to add a new task template? |
-
Click on the Masters menu on the Top menu bar to view the menu items available in the Masters menu. Now click on the Task Templates menu item. A Task Templates page opens in the User’s dashboard area.

Figure 26: Task Templates page
-
Select the department from the Department dropdown list box. The list of available templates is displayed in the data grid available below the Upload button.
-
Select the project type from the Project Type dropdown list box.
-
Specify name of the template in the Template Name text field and browse for the XML template file using the Browse button.
-
Click upon the Upload button to upload the selected document.
|
|
Things to remember |
Fields marked with a “*” are mandatory.
|
|
How to view the templates uploaded for a particular department? |
-
Click on the Masters menu on the Top menu bar to view the menu items available in the Masters menu. Now click on the Task Templates menu item. A Task Templates page opens in the User’s dashboard area.
-
Select the department from the Department dropdown list box. The list of templates uploaded for the specified department is displayed in the data grid available below the Upload button.
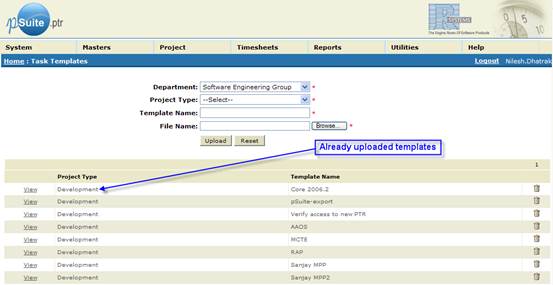
Figure 27: The list of uploaded templates
-
Click upon the View button that appears before each record in the data grid to view the tasks listed in the template. A View Task Template page opens.
|
|
How to remove a task template record from the pSuite? |
-
From the Task Templates page click on the
button of the row containing the template details to remove the selected record.