


The timesheet or PTR is a project tracking and reporting tool exclusively used by RSI to track the day to day activities of the project resources and development. The PTR also generates different types of reports to track resource performance, project’s current status, overall throughput of the application and other useful information.
This section describes different PTR terminologies and how to use the PTR for project tracking and management.
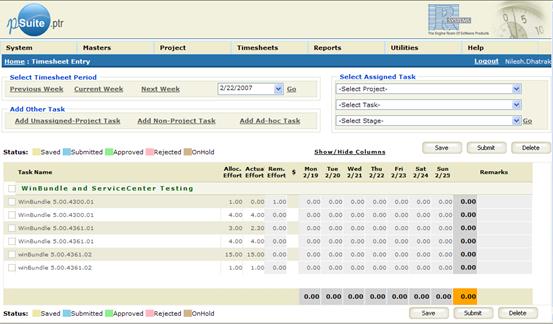
Figure 39: Timesheet
|
|
What are the different types of tasks in PTR? |

All project related tasks are categorized into four major categories:
-
Assigned tasks
-
Unassigned tasks
-
Ad-hoc tasks
-
Non-project tasks
|
|
What are the assigned tasks? |
The assigned tasks are those project tasks which have been assigned to a project resource by the project manager or project leader. Each project resource should specify the actual efforts made by him/ her to complete the assigned tasks. Once an assigned task is completed by the resource, it can be forwarded to other resources or himself/ herself also for review, testing or the next stage of development.
|
|
What are the unassigned tasks? |
The unassigned tasks are those project tasks which are not assigned to the project resource. The project resource can choose any of the non-assigned project tasks and fill the timesheet against it, if the efforts have been made by him/ her to complete it (partially or completely).
|
|
What are the ad-hoc tasks? |
The ad-hoc tasks are those tasks or functionalities which were not included during the workflow development/ task definition for the project. The project resource can add a new ad-hoc task and fill the timesheet against it, if the efforts have been made by him/ her to complete it (partially or completely).
|
|
What are the non-project tasks? |
The non-project tasks are those tasks which are not the part of a project. Leaves, holidays, self training, etc. are considered as non-project tasks. A project resource can add non-project tasks and fill the timesheet against them, if these have been availed by him/ her. These tasks are also considered as completely non-billable tasks.
|
|
What is a timesheet entry status? |
A timesheet entry status is the current status of the timesheet entry filled by the resource. There are five different kinds of timesheet entry status available in PTR:
-
Saved – The status of a timesheet entry, when once saved by the resource. A timesheet entry with status as “Saved” can be modified by the resource.
-
Submitted – The timesheet entries submitted by the resource. A timesheet entry with status as “Submitted” cannot be modified by the resource.
-
Approved – The timesheet entries approved by the immediate reporting officer (project manager). A timesheet entry with status as “Approved” cannot be modified by the resource.
-
Rejected – The timesheet entries rejected/ denied by the immediate reporting officer (project manager). A timesheet entry with status as “Rejected” should be corrected and resubmitted by the resource.
-
On-hold – The timesheet entries that are put on-hold by the immediate reporting officer (project manager).
|
|
How to view the list of tasks for the projects assigned? |
-
Click on the Timesheet menu on the Top menu bar to view the menu items available in the menu. Now click on the My Tasks View menu item. The My Tasks View page opens in the User’s dashboard area.
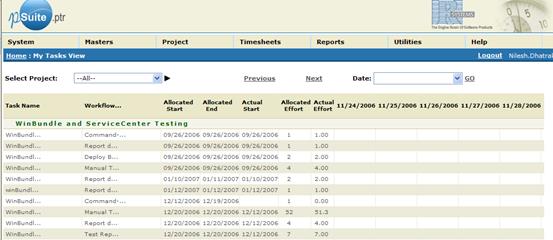
Figure 40: My Tasks View page
-
A project-wise list of the tasks for all projects that belongs to the current user is displayed in the data grid. Also, the date-wise timesheet filled against the specified tasks by the resources is also displayed in the data grid. The date-wise list is displayed from the date of task allocation till the allocated end date.
|
|
How to view the tasks list of a specific project? |
-
From the All Tasks View page, select a project from the Select Project dropdown list box (available at the upper-right corner of the page) in order to view the task and efforts list for the selected project.
|
|
How to view tasks list for a particular week? |
-
Click on the Previous / Next button to view the tasks list for previous or next week from the selected week.
-
The report for a specific week can also be viewed. Select the day of the week from the Date field (available at the upper-right corner of the page) and click on the Go button to view the report for the selected week.
|
|
How to fill the timesheet? |
-
Click on the Timesheet menu on the Top menu bar to view the menu items available in the menu. Now click on the Timesheet Entry menu item to fill the timesheet. See Timesheet Entry for further details
|
|
How to review the timesheet for the project resources? |
-
Click on the Timesheet menu on the Top menu bar to view the menu items available in the menu. Now click on the Timesheet Review menu item to review the timesheet for the project resources. See Timesheet Review for further details
This section describes how to fill timesheet for a particular week.
|
|
How to select a week for filling up the timesheet? |
-
Initially the timesheet for the current week is displayed in the PTR. Click on the Previous Week, Current Week or the Next Week button from the Select Timesheet Period panel to fill or view the timesheet for the relevant week.
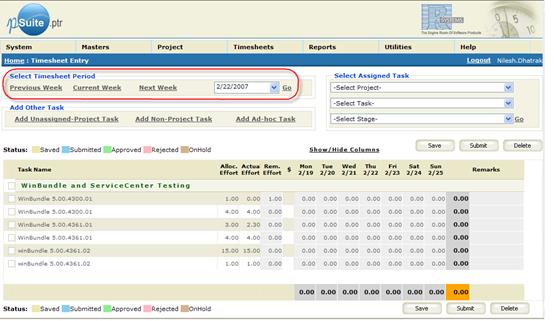
Figure 41: Select Timesheet Period panel (highlighted)
-
The timesheet can also be submitted for a specific week. Select a date from the date dropdown list box and click on the Go button to fill and submit the timesheet for the selected week.
|
|
How to select an assigned task for filling up the timesheet? |
-
Select a project, a task and the current stage of the task from the Select Assigned Task panel and click on the Go button of the panel to add the selected task in the data grid.
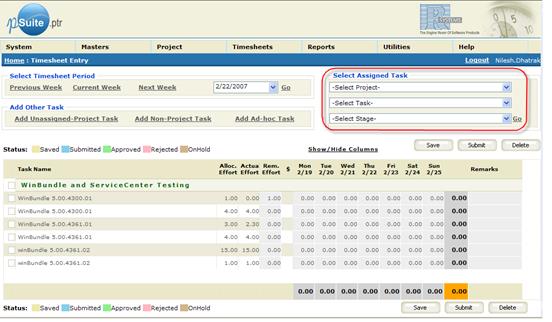
Figure 42: Select Assigned Task panel
-
If the task is already available in the data grid then it will get selected in the grid otherwise a new entry is added under the selected project.
|
|
How to select the unassigned and add-hoc tasks for filling up the timesheet? |
-
Click on the Add Unassigned Project Task or Add Ad-hoc Task button from the Add Other Task panel to add an unassigned and/ or ad-hoc task respectively. An Add Task popup window opens.
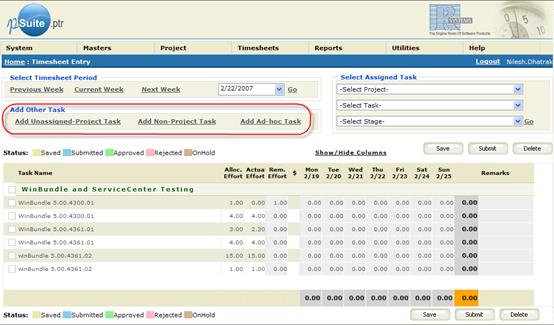
Figure 43: Add Other Task panel
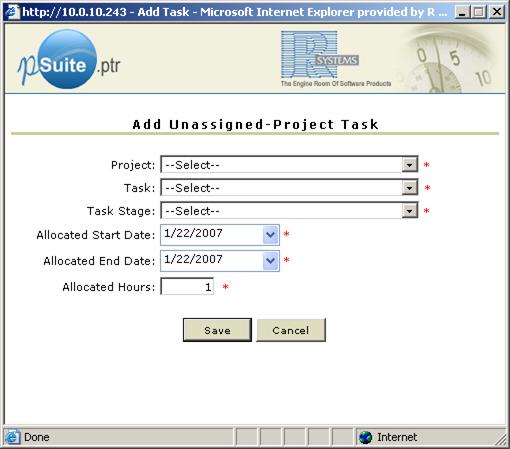
Figure 44: Add Task page
-
Select a project, an un-assigned task, the current stage of the task, the allocated start date and allocated end date and number of allocated hours in relevant fields. Click on the Save button to add the specified task in the data grid of the Timesheet page.
-
If the task is already available in the data grid then it will replaced with new values for allocated effort. Otherwise, a new entry is added under the selected project.
-
Similarly, add the add-hoc tasks.
|
|
How to select a non-project task for filling up the timesheet? |
-
Click on the Add Non-Project Task button from the Add Other Task panel. An Add Task popup window opens.
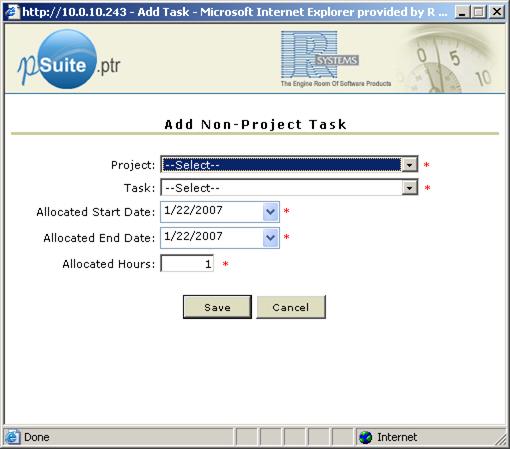
Figure 45: Add Task page (for non-project tasks)
-
Select a project, a non-project task, the allocated start date, allocated end date and number of allocated hours in relevant fields. Click on the Save button to add the specified task in the data grid of the Timesheet page.
-
A new task entry is added under the selected project.
|
|
How to view workflow stages, allocation start date and other project related information while filling up the timesheet? |
-
Click on the Show/ Hide Columns button and select the project task related information. Click on the Submit button to view the specified information.
|
|
How to fill a timesheet entry? |
-
Specify the number of hours of efforts made for completing the tasks, in the date column that appear for each record in the data grid.
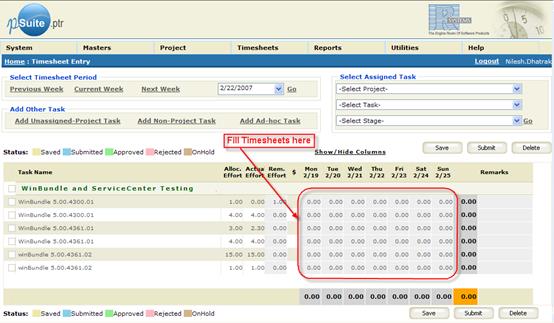
Figure 46: Timesheet Entry page
|
|
How to fill a non-billable timesheet entry? |
-
Click on the Show/ Hide Columns button and select the Non-Billable Entries option from the popup. Click on the Submit button in the popup to view the non billable column with each date column. A $ mark appear for each billable entry sub-column and N$ mark for the non-billable entry sub-column.
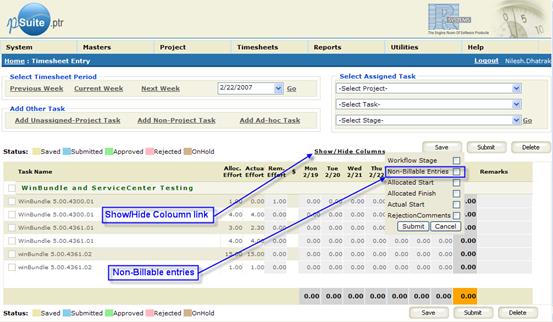
Figure 47: Select Non-Billable Entries column
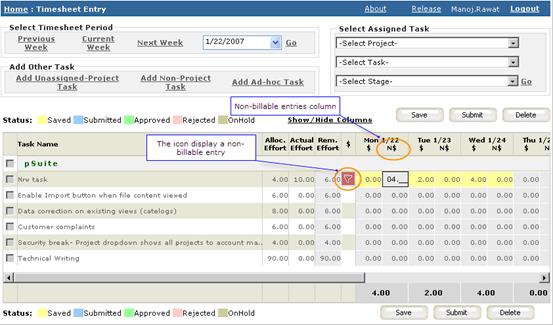 Figure 48: Timesheet Entry for non-billable entries
 -
Now, specify the number of non-billable hours spent for the tasks, in N$ sub-column of the date columns.
|
|
How to increase remaining efforts for a task? |
-
Click on the Rem. Effort column and specify the modified remaining efforts values.
|
|
What is the minimum and maximum number of hours per day to fill the timesheet? |
The minimum and maximum number of hours for filling up the timesheet in a day is zero (0) and twenty four (24) respectively.
|
|
What does the message “Entering this timesheet will set the remaining hours to 0 indicating that the Task has been completed.” specifies? |
This message appears when the allocated effort for a non-project task is equal to the actual effort for the task. Now, no more timesheet entries against the selected task can be filled and submitted by the resource.
|
|
What does the message “Entering this timesheet will set the remaining hours to 0 indicating that the task’s current stage has been completed. The task can be assigned to another resource to work on a different stage” specifies? |
This message appears when the allocated effort for an assigned or unassigned task is equal to the actual effort for the task. Now, the specified task can be assigned to a resource working on the same task in the next stage of development. Clicking upon the OK button opens the Assign Task page in a popup window. See Assign Tasks for details on assigning tasks to a resource
|
|
How to save the timesheet entries? |
-
Click on the Save button in order to save the changes made in the timesheet into the database. A saved timesheet entry can be modified until it is submitted for review.
-
While saving the timesheet entries, an
 image appears in the $ column of the data grid for specifying the non-project task entries in the row.
|
|
How to submit the timesheet entries for review? |
-
Click on the Submit button in order to submit the timesheet entries for review by the immediate reporting officer (project manager). A submitted timesheet entry cannot be modified until it is rejected by the reporting officer.
-
While submitting the timesheet entries, an
image appears in the $ column of the data grid for specifying the non-project task entries in the row.
|
|
How to delete the timesheet entries? |
-
The pSuite allows the deletion of only unassigned and non-project task entries unless the entries are submitted.
-
Select a non-project/ unassigned task and click on the Delete button to delete the selected entry.
This section describes how to review the timesheet of the project resources.
|
|
How to view the timesheet report? |
-
Click on the Timesheet menu on the Top menu bar to view the menu items available in the menu. Now click on the Timesheet Review menu item. A Timesheet Review page opens in the User’s dashboard area.
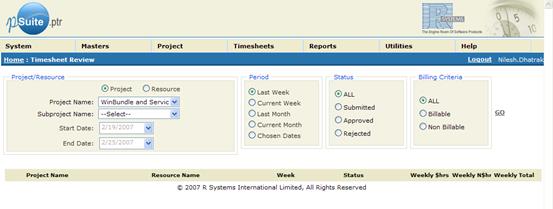
Figure 49: Timesheet Review page
-
Select the project, start date and end date for timesheet review from the Project panel. Initially the start and end dates for the current week is selected.
-
Specify the time criteria, timesheet status and billing criteria from the Time, Status and the Billable panels respectively. Click on the Select button to view the timesheet for the specified criteria.
-
The timesheet entries are displayed in the data grid.
|
|
How to review the timesheet of a resource? |
-
Click on the Status column of the row containing the timesheet entry for the specified resource. A Review Timesheet page opens showing the timesheet entries for the specified resource.
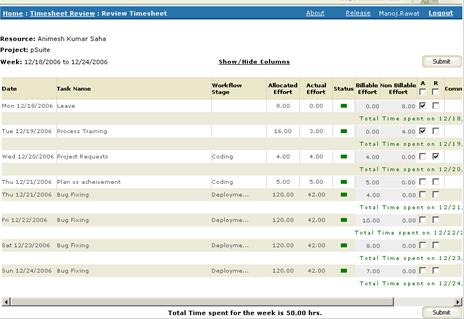
Figure 50: Review Timesheet page
-
Click on the checkboxes that appear in the “A” and “R” columns to approve or reject the timesheet entries. It is always advisable to specify the reasons for rejecting the timesheet in the Comments column.